

Healing Hands Student App: Download, Sign In, and Feature Guide
The Healing Hands app gives enrolled Healing Hands Massage Institute students one secure place to review internship appointments and academic progress. During internship, you can use the app to check your schedule, prepare for a patient’s visit, review intake information, create a treatment plan, write an objective patient note, and track completed hours. You can also review courses, attendance, grades, and makeup requirements.
Before you begin
You will need:
- An active Healing Hands student account.
- Access to the email address you used when applying to or enrolling with Healing Hands.
- A compatible Apple or Android device.
- An internet connection. Turn off airplane mode and connect through Wi-Fi or cellular data before downloading or signing in.
The app displays live schedule and student-record information. Keep your device secured, do not share your sign-in code, and access patient information only when it is needed for your assigned internship work.
Download the Healing Hands app
Use the official store link for your device. On the store page, confirm that the app is named Healing Hands and that the developer is Healing Hands Massage Institute or Healing Hands Massage Institute LLC.
Download on an iPhone or iPad
The current Apple release supports iPhone and iPad and requires iOS or iPadOS 16.4 or later.
- Open the App Store on your device.
- Search for Healing Hands.
- Select the app published by Healing Hands Massage Institute.
- Tap Get and complete Apple’s download confirmation.
- When installation finishes, tap Open or find the Healing Hands icon on your Home Screen or in the App Library.
Open Healing Hands in the Apple App Store
Download on an Android device
The current app supports Android 7 or later. Google Play will confirm whether the app is compatible with your particular device.
- Open the Google Play Store on your device.
- Search for Healing Hands.
- Select the app with the package name com.healinghands.hhmi, published by Healing Hands.
- Tap Install.
- When installation finishes, tap Open or find the Healing Hands icon in your app list.
Open Healing Hands in the Google Play Store
If the store says that your operating system is too old, update your device before trying again. Store requirements and download sizes can change as the app is updated; the store listing is the best source for the requirement that applies to the current release.
Sign in with your student email
Healing Hands uses a one-time passcode instead of a password.
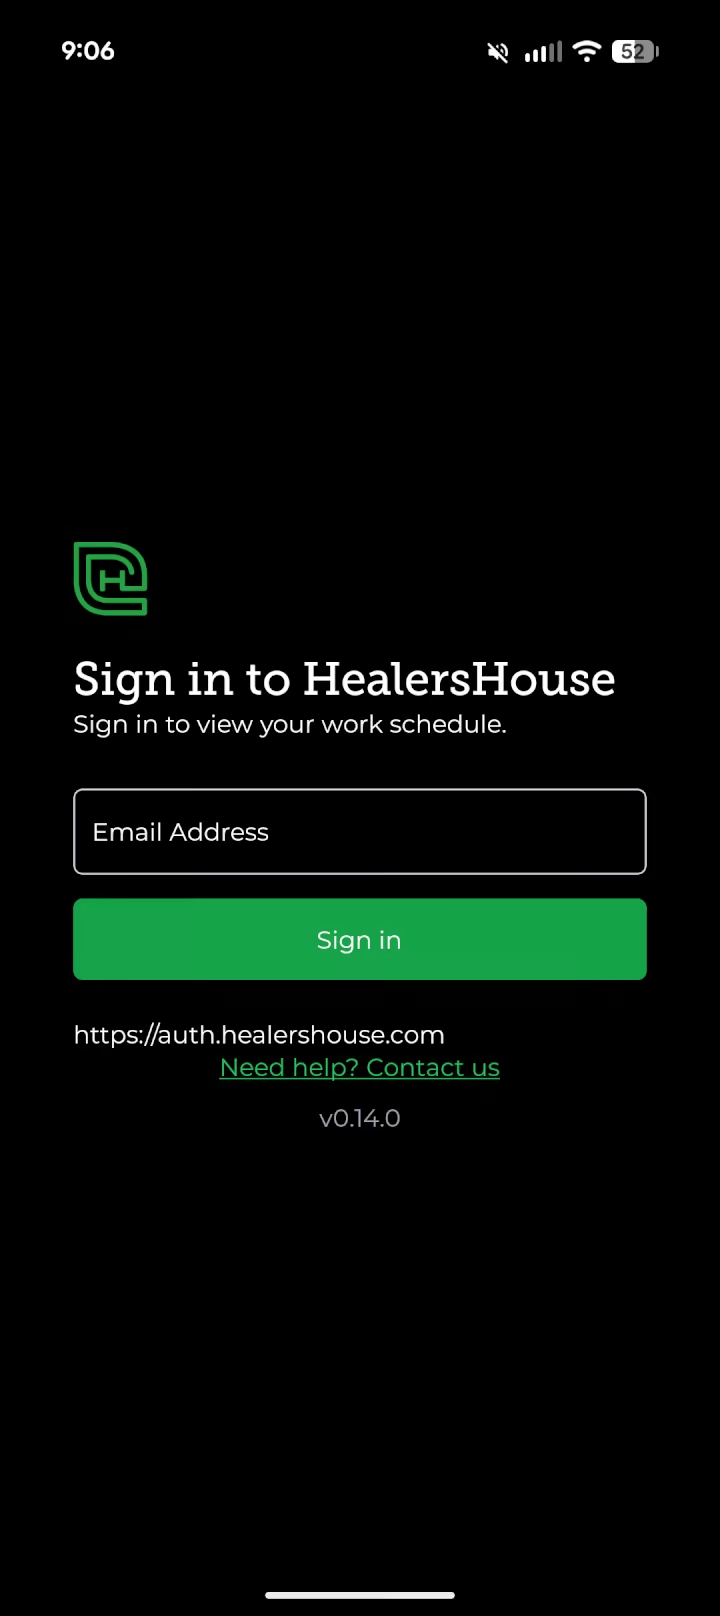
- Open the app.
- Enter the email address connected to your Healing Hands student record. In most cases, this is the email address used during your online application or enrollment.
- Tap Sign in.
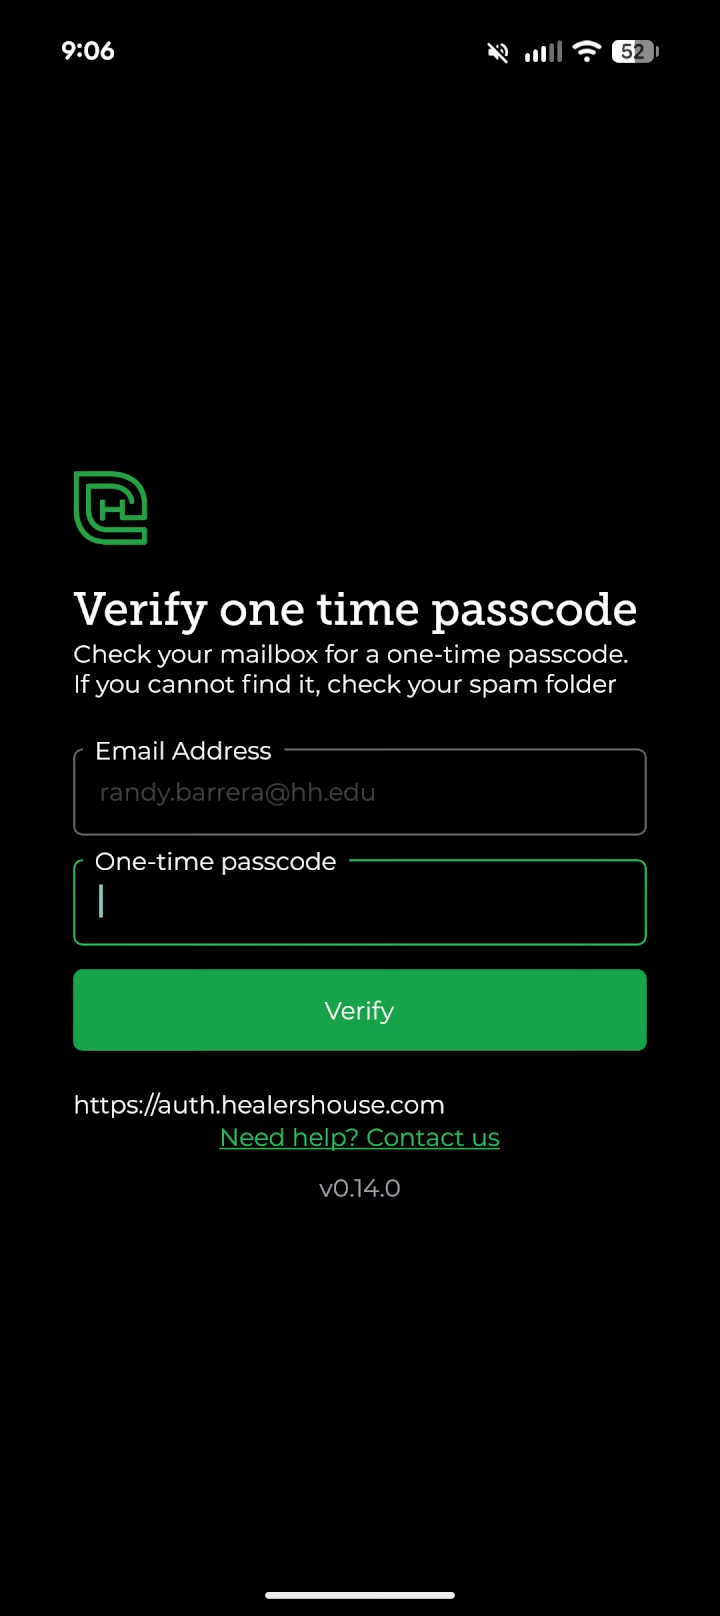
- Open your email and find the six-digit one-time passcode from Healing Hands. Check your spam or junk folder if it does not appear in your inbox.
- Return to the app, enter the code in the One-time passcode field, and tap Verify.
The app securely links your account to your device after verification, so you will normally remain signed in on later visits. Never forward or share a one-time passcode with anyone.
Allow notifications
Allow notifications when your device asks. Healing Hands uses notifications for time-sensitive schedule and appointment information. Tapping a supported appointment notification can take you directly to that appointment’s details.
If you cannot sign in
- Confirm that you entered the email address held in your Healing Hands student record.
- Check your spam or junk folder for the one-time passcode.
- If a code is rejected, request a new sign-in attempt and enter the newest code.
- If the app says that another account was previously used on the device, tap Clear Cache, then sign in again with the correct account.
- If the app says you do not have access to the Healing Hands branch, sign out and contact the school so your access can be reviewed.
- If the app cannot connect, confirm that airplane mode is off and that your internet connection is working, then try again.
For help, email [email protected], email [email protected], or call 972-234-4224.
Navigate the app
Use the three icons at the bottom of the screen to move between the app’s main areas:
- Home / Appointments — review your internship calendar and today’s activity.
- Academic Progress — review program, internship, course, class-attendance, grade, and makeup information.
- Settings — view your account, contact the school, check for updates, find app information, or sign out.
The app opens on your appointment schedule so you can see your workday quickly. It also follows your device’s light or dark appearance setting. English and U.S. Spanish interfaces are available based on a supported device language.
Review your internship calendar
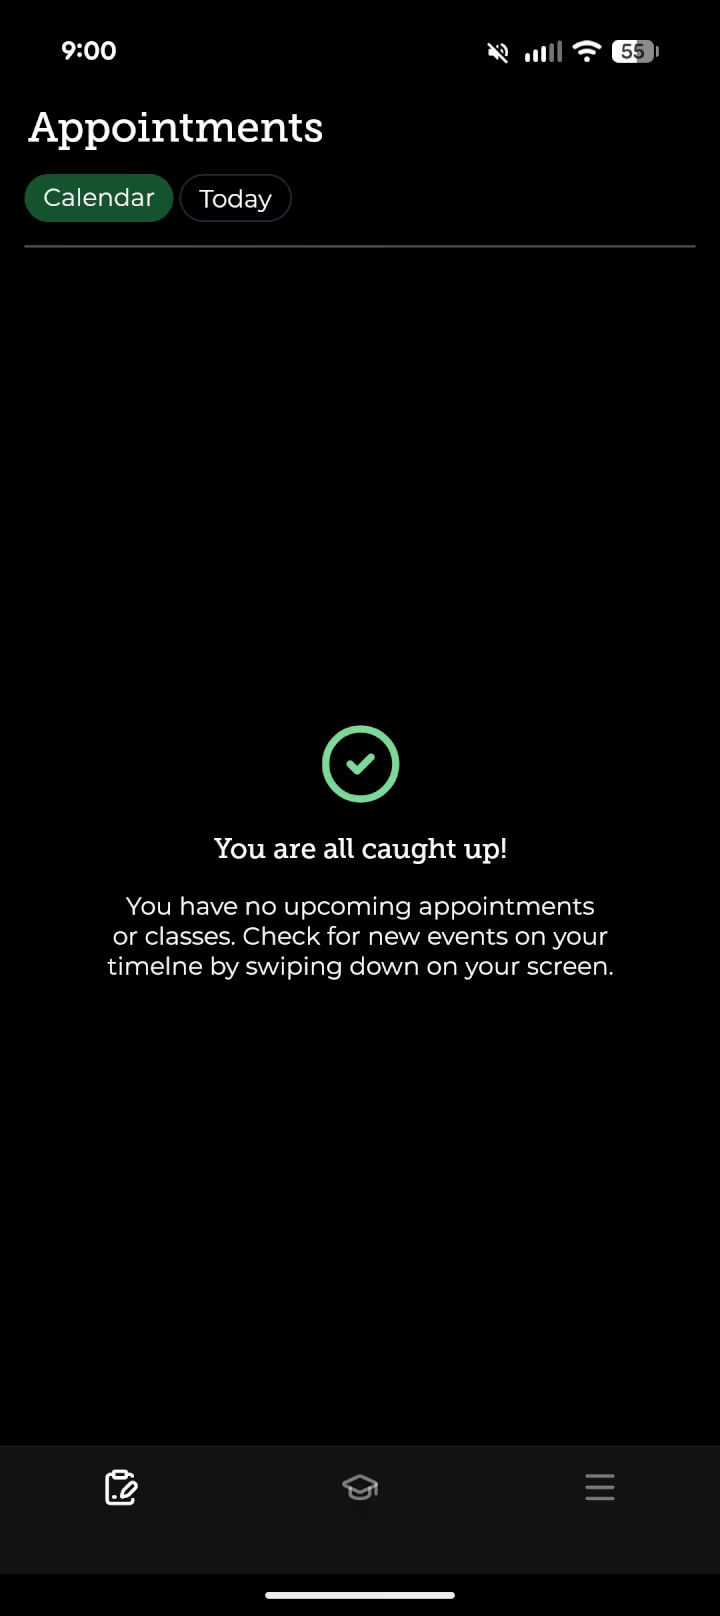
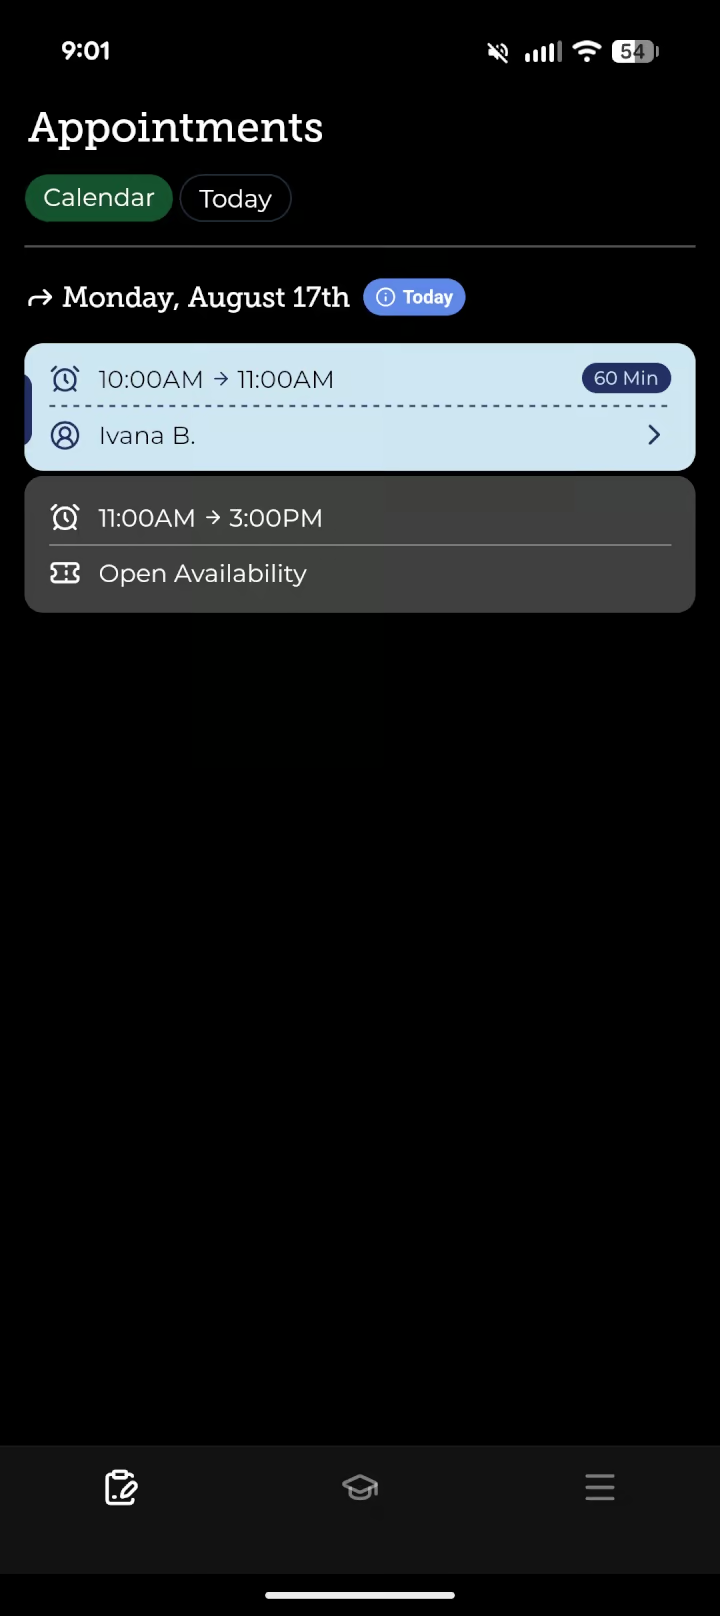
The Appointments area has two views: Calendar and Today.
Calendar
The Calendar view groups upcoming internship events by date. Swipe down on the list at any time to refresh it.
You may see three kinds of schedule blocks:
- Appointments show the start and end time, session length, patient, and current status. Tap an appointment to open its details.
- Break Time identifies time intentionally reserved away from appointments.
- Open Availability identifies time during your scheduled internship period that may still be booked for a patient. Unless school staff tells you otherwise, remain on campus and available during open time.
Open availability can change as patients schedule or cancel appointments. Refresh the screen and check your calendar throughout the day.
Today
The Today view keeps the day’s appointment history together, including events that have already ended. It can include completed, cancelled, and no-show appointments as well as the rest of today’s scheduled activity.
At the bottom, the app summarizes:
- Internship hours completed today.
- Internship hours still pending today.
Cancelled and no-show appointments do not count toward accrued internship hours.
Understand appointment statuses
Appointment cards use a label and color to make each state easy to recognize:
| Status | Color | Meaning |
|---|---|---|
| Scheduled | Blue | The appointment is booked but the patient has not checked in. |
| Checked In | Purple | The patient has arrived and checked in. |
| Completed | Green | The appointment has been completed. |
| Cancelled | Orange | The appointment was cancelled. |
| No Show | Red | The patient did not arrive for the appointment. |
Prepare for an appointment
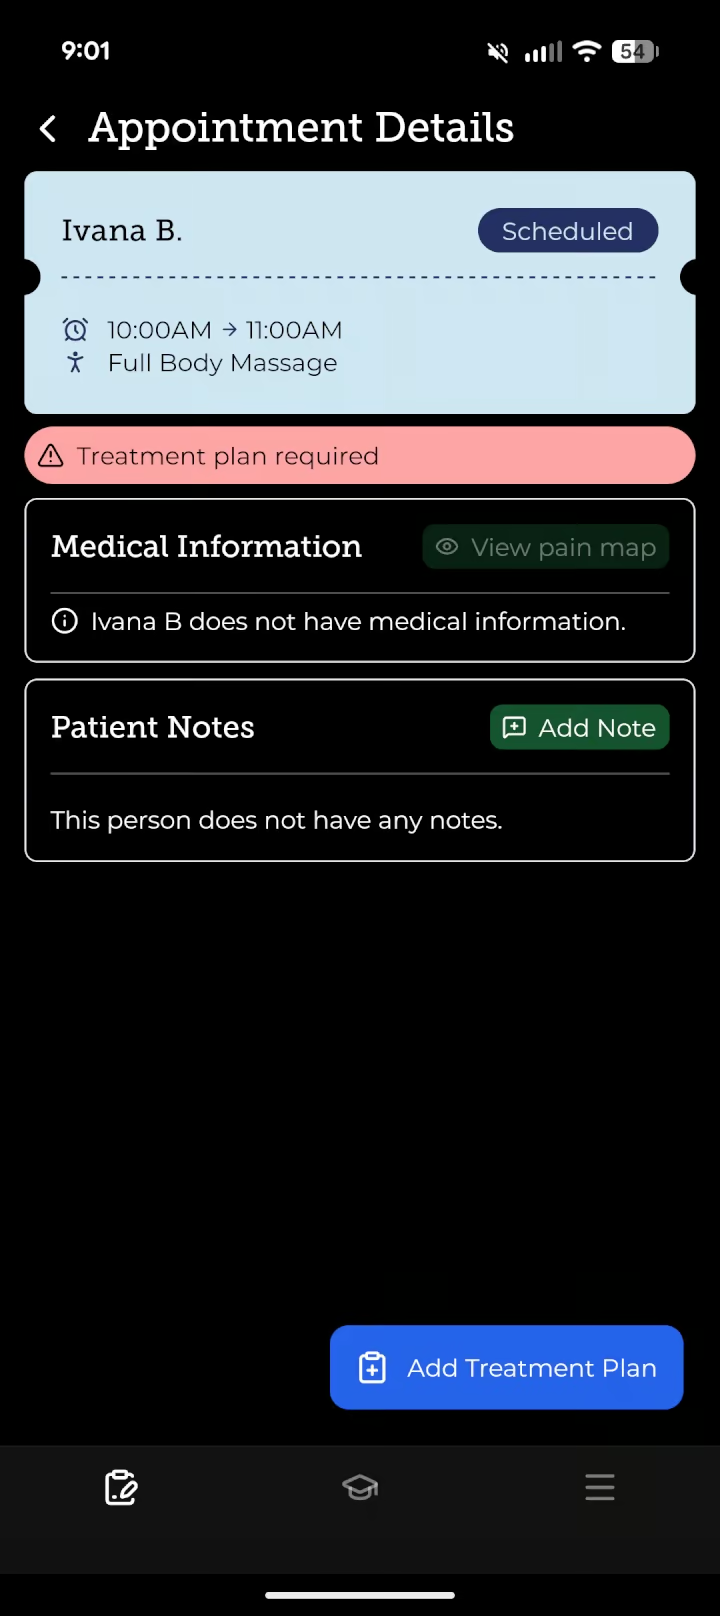
Tap an appointment card to open Appointment Details. The first card shows the patient’s name, appointment status, start and end time, scheduled service, and any appointment-level alert or note.
The app may also display a Minor badge and a prominent notice when the patient is under 18. Follow all Healing Hands procedures for treating a minor and ask the front desk or an instructor if you need guidance.
Swipe down on the appointment-details screen to retrieve the latest available information before beginning the session.
Complete the treatment plan
A treatment plan is required for your work with a patient. When no plan is on file for you, the appointment screen displays a red Treatment plan required notice and an Add Treatment Plan button.
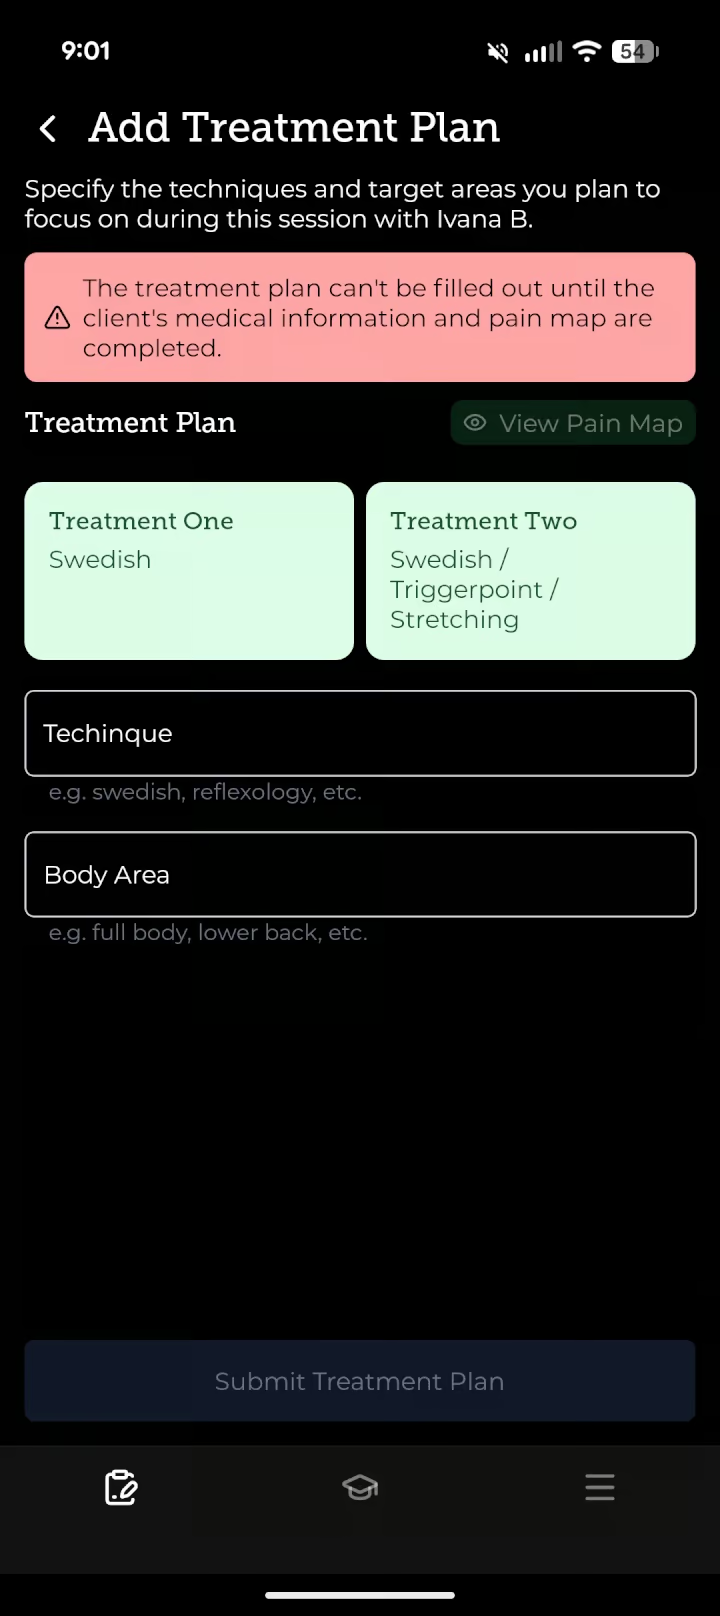
You cannot submit the plan until the patient has completed both parts of intake:
- Medical information.
- Front and back pain map.
If either item is missing, the form explains that intake is incomplete and keeps the submission button unavailable. Do not work around this safeguard; ask the front desk to help the patient complete intake.
To create a treatment plan:
- Tap Add Treatment Plan.
- Review the patient’s medical information and pain map before choosing a plan.
- Select one of the quick-treatment options, or enter a more specific plan.
- Complete both required fields:
- Technique — for example, Swedish or reflexology.
- Body Area — for example, full body or lower back.
- Tap Submit Treatment Plan.
After submission, the appointment screen displays the plan’s date, technique, and body area. If the planned work changes after speaking with the patient, tap Change Plan and submit an accurate replacement.
Review patient intake information
Medical information
The Medical Information card may show:
- Medical conditions.
- Medications.
- Allergies.
- Recent surgeries.
- A pregnancy due date.
Read this information before beginning treatment. If an item may affect the session or you are unsure how to proceed, pause and speak with an instructor or the front desk. Confirm important details directly with the patient rather than treating the app as a replacement for your consultation.
Pain map
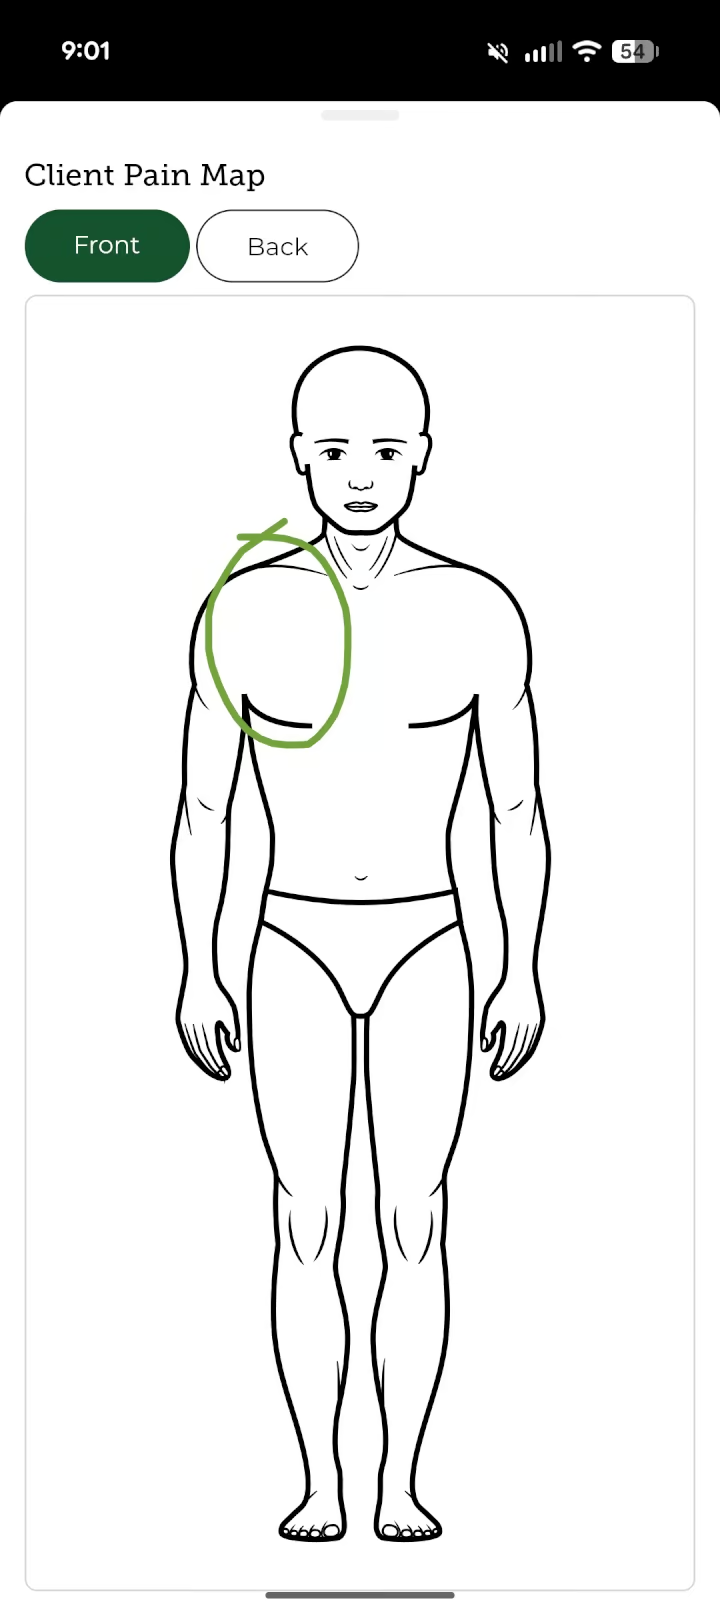
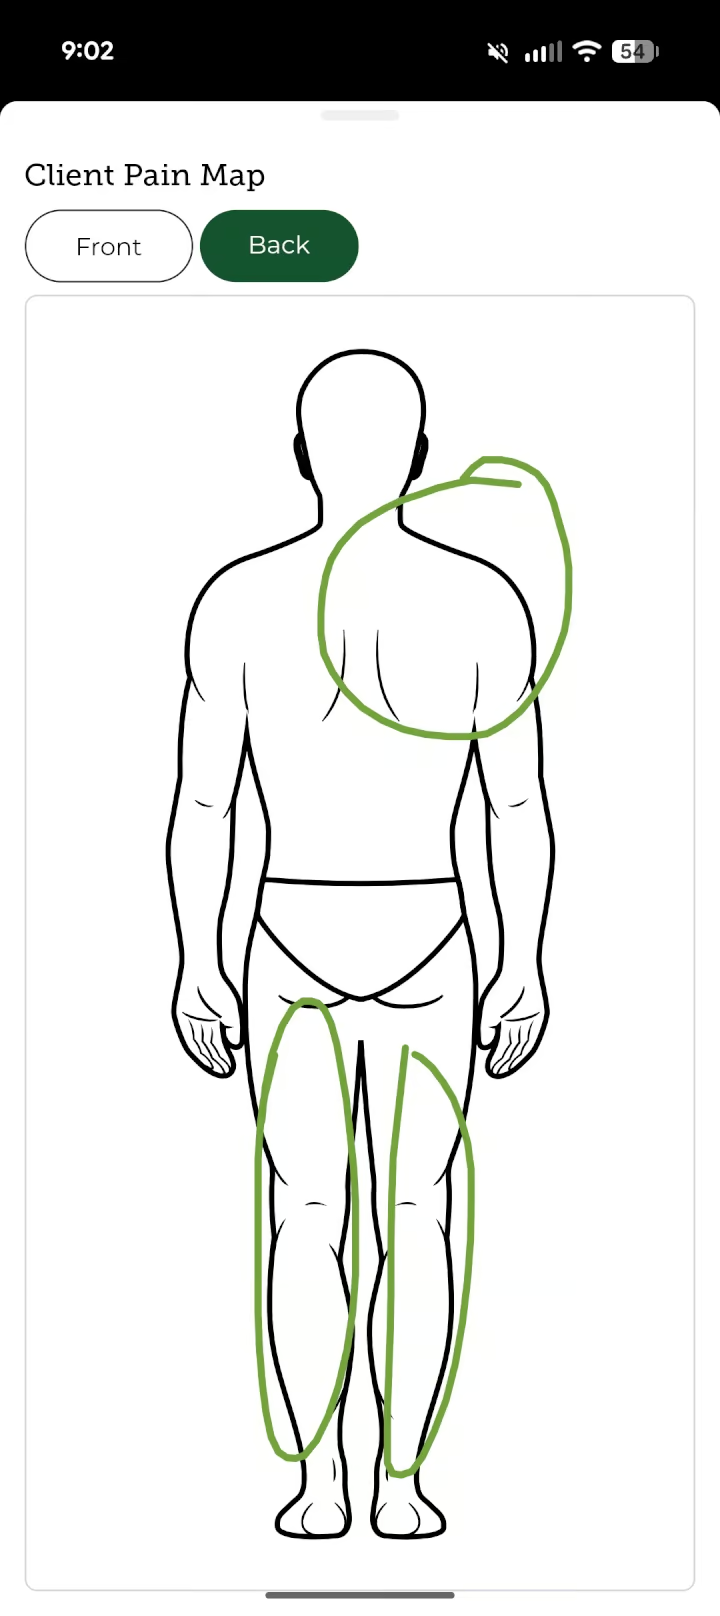
Tap View pain map from Medical Information or the treatment-plan form. Switch between Front and Back to review all marked areas. Green markings indicate areas the patient wants addressed, while red markings indicate areas to avoid.
If no pain map is available, the button remains unavailable. Ask the front desk for help completing the patient’s intake before creating the treatment plan.
Read and add patient notes
The Patient Notes card displays objective notes already associated with the patient, including the author’s name or initials and the date written. These notes can help you understand relevant observations from earlier sessions.
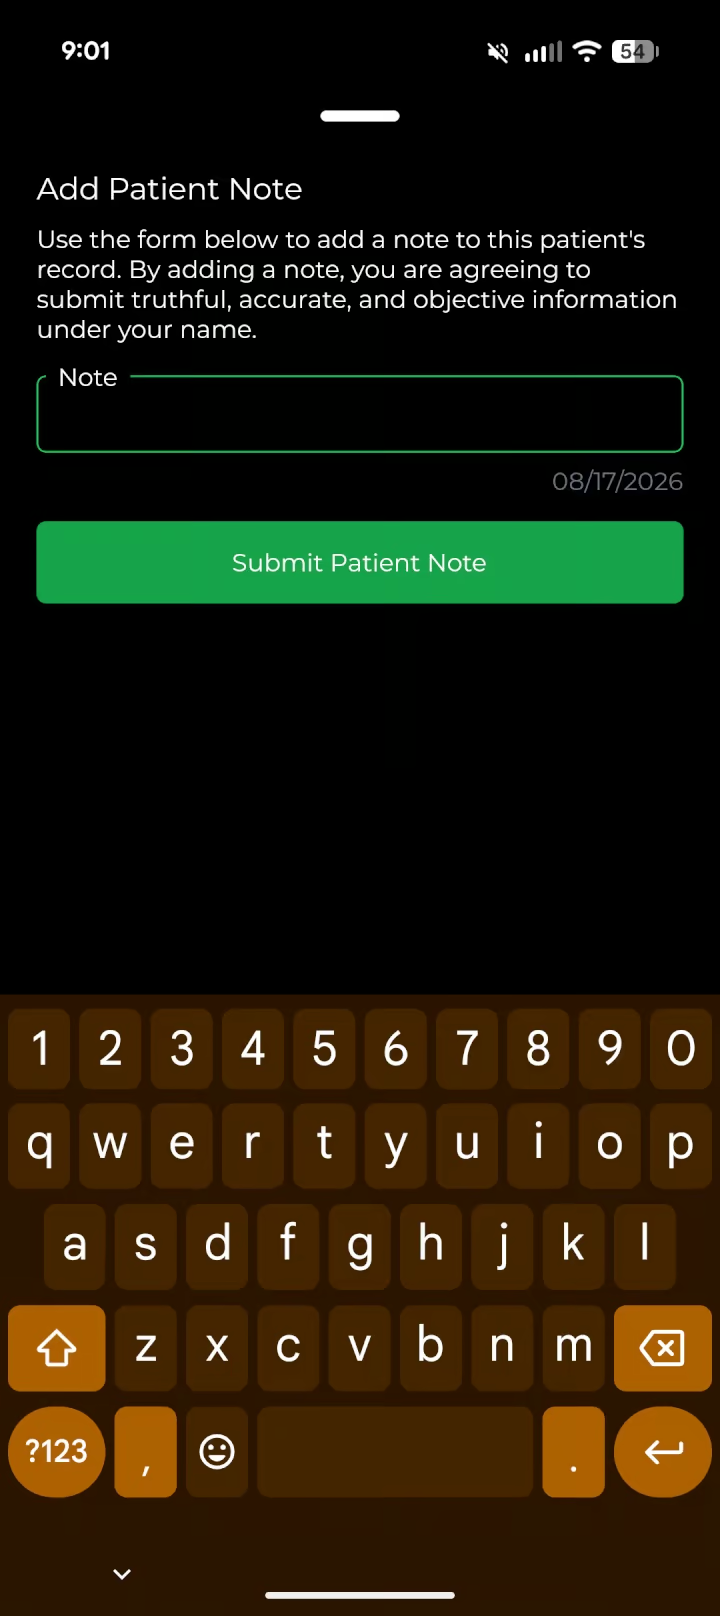
To add a note:
- Tap Add Note.
- Write a truthful, accurate, and objective observation that will help future student therapists care for the patient.
- Tap Submit Patient Note.
Your note is recorded under your account. Do not include personal opinions, jokes, unrelated details, or disrespectful language. For urgent, sensitive, or behavioral concerns, speak directly with the front desk or an administrator instead of relying only on a note.
Follow your academic progress
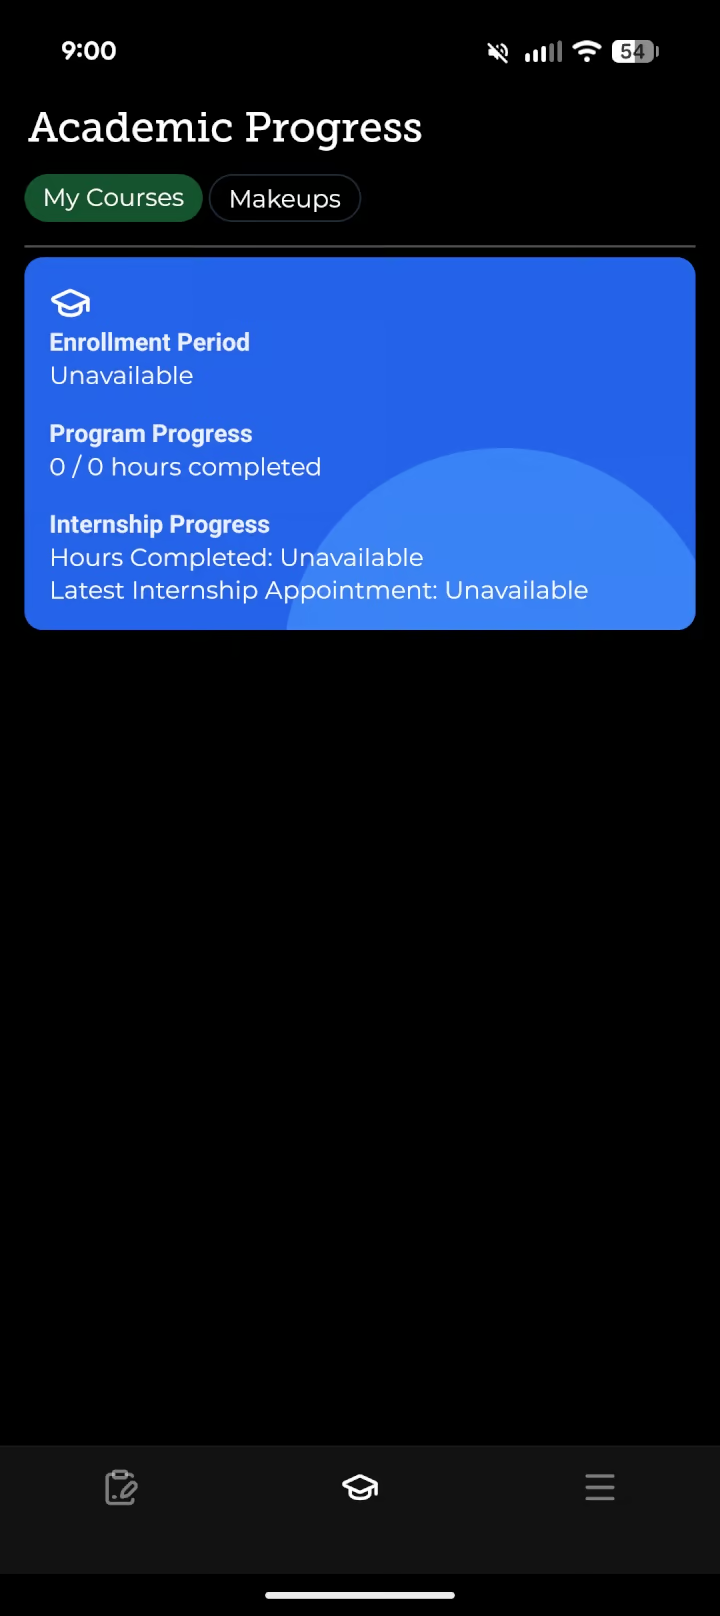
Tap the graduation-cap icon to open Academic Progress. Swipe down to refresh the report.
The summary card shows:
- Enrollment Period — the start and expected end of your enrollment.
- Program Progress — attended course hours compared with total program clock hours.
- Internship Progress — completed internship hours and the date of your latest internship appointment.
The app may warn you when your enrollment end date is approaching. Treat this as a prompt to review your standing and contact Student Services with questions.
My Courses
The My Courses view lists the courses in your program. A course card can show its start or end date and a Missing Test warning when an assessment needs attention.
Tap a course to review:
- Course code and name.
- Course start and end dates.
- Total clock hours.
- Completed hours.
- Final grade, when available.
- Individual class meetings and their dates and times.
- Makeup Required notices for classes with unresolved absence time.
Some program-level entries, such as the internship course, may appear only in the overall summary and may not open as a standard course-detail page.
Makeups
Open the Makeups view to review missed class time that still needs to be completed. Each outstanding item identifies the class and the remaining makeup minutes.
Makeup time is not scheduled inside the app. Use the email link in this view to contact [email protected] and arrange it. After your completed makeup time is recorded by the school, refresh Academic Progress to see the updated balance.
The app is a convenient view of your current record, but Student Services remains the authoritative contact for questions about grades, attendance, makeup credit, internship hours, or enrollment dates.
Use Settings and keep the app current
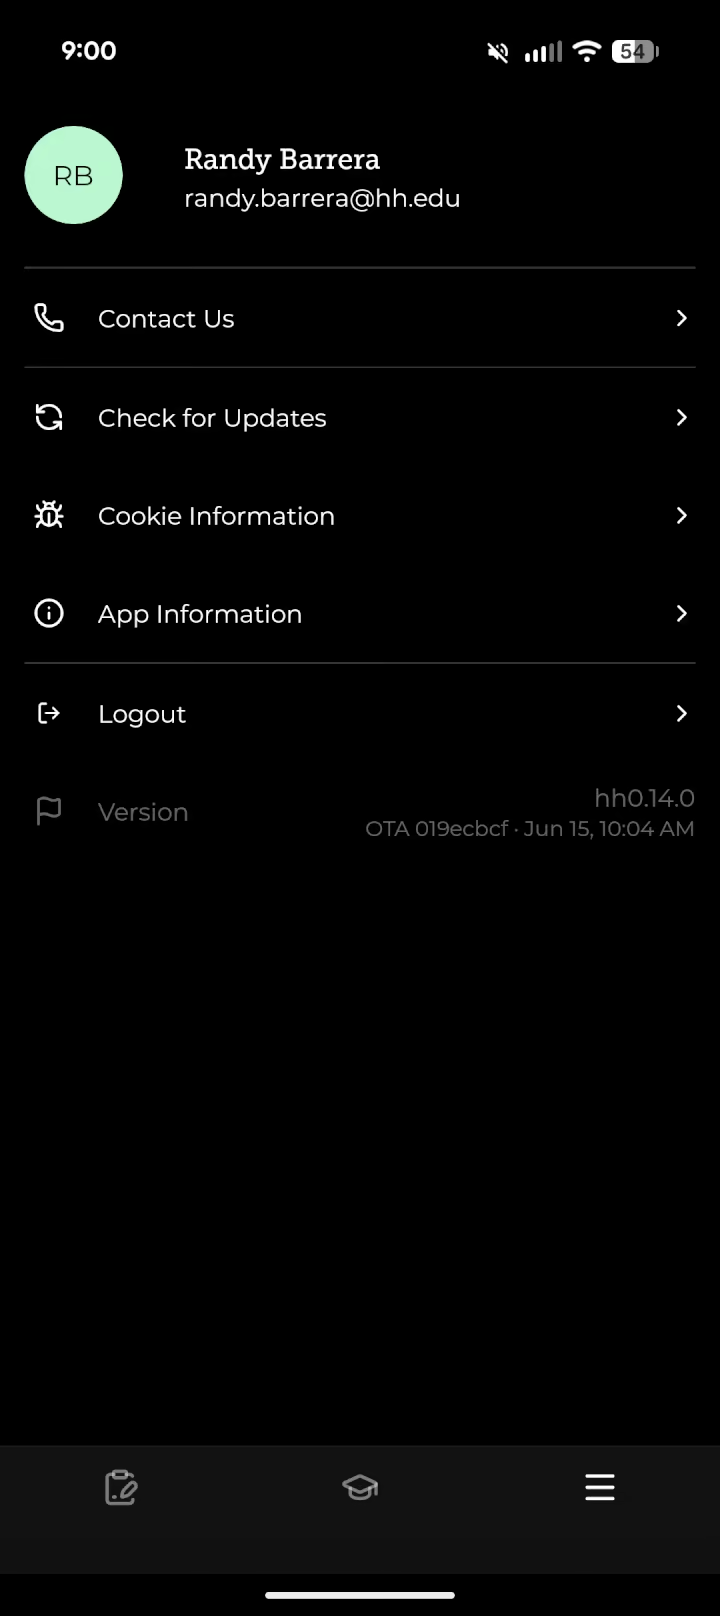
The Settings tab shows your name and student email. From this screen, you can:
- Tap Contact Us to call Healing Hands.
- Tap Check for Updates to look for the newest app update.
- Open App Information when support asks for device or build details.
- Find the installed version and build information near the bottom of the page.
- Tap Logout to remove the account and secure device identity from the app.
Healing Hands can also deliver some updates directly through the app. When an update has downloaded, you may see A new update is ready. Tap the message to restart and apply it, or use Check for Updates in Settings. Install App Store and Google Play updates when offered because some changes require a full store release.
Quick troubleshooting
My schedule or report looks old
Swipe down on the current screen to refresh it. Confirm that your device has internet access. If the information still appears incorrect, contact Student Services; the app displays information from the school’s records and cannot edit scheduling, attendance, or grades directly.
I cannot add a treatment plan
Confirm that the patient’s medical information and pain map are both complete. If the app says intake is required, ask the front desk to complete the patient’s intake workflow.
I cannot open the pain map
The View pain map button is unavailable when no map is on file. Ask the front desk to confirm the patient’s intake.
I signed in with the wrong account
Open Settings and tap Logout. On the sign-in screen, enter the correct student email. If the app reports that the device is connected to a different account, use Clear Cache and try again.
The app reports a connection problem
Turn off airplane mode, confirm Wi-Fi or cellular data is working, and try again. The app is designed to recover from brief connection interruptions, but current schedule and patient information still requires network access.
You are ready to use the app
The Healing Hands app is designed to help you arrive prepared, protect the quality of patient care, document internship work, and understand your academic progress. Check it before each internship shift, refresh it throughout the day, and keep it updated.
If an appointment, patient record, grade, attendance entry, or hour total seems incorrect, do not try to correct it through an unrelated note. Contact Healing Hands so the appropriate staff member can review the source record.
For assistance:
- Student and academic questions: [email protected]
- General app or account help: [email protected]
- Phone: 972-234-4224